
The BuddyBoss App integrates with The Events Calendar and Events Calendar Pro to provide a complete event management experience in the BuddyBoss App. Once configured, members can browse upcoming events, view event details, purchase tickets, RSVP, and access event tickets directly from the app.
Users can also manage event schedules, and add events to their calendars via the web fallback
Note: This integration is available for the BuddyBoss App Launch users.
Depending on the features you want to offer, you may also need additional add-ons such as Event Tickets, Event Tickets Plus, or other Events Calendar extensions.
Setup Events Calendar
Download The Events Calendar Plugins
Download the required plugins from the official Events Calendar website.
Install the Plugins
After downloading the plugin ZIP files:
- Log in to your WordPress Admin Dashboard.
- Navigate to Plugins > Add New Plugin.
- Click Upload Plugin.
- Select the plugin ZIP file.
- Click Install Now.
- Click Activate.
- Repeat the process for Events Calendar Pro.
Note: Events Calendar Pro requires The Events Calendar plugin to be installed and activated first.
Verify the Installation
After activation:
- Navigate to Events in the WordPress Admin Dashboard.
- Confirm that the Events Calendar menus are available.
- Configure your events before syncing them with the BuddyBoss App.
Add Events to the BuddyBoss App Menu
Once your events have been configured, you can add the main Events screen to your app navigation. There is no separate integration setting to enable.
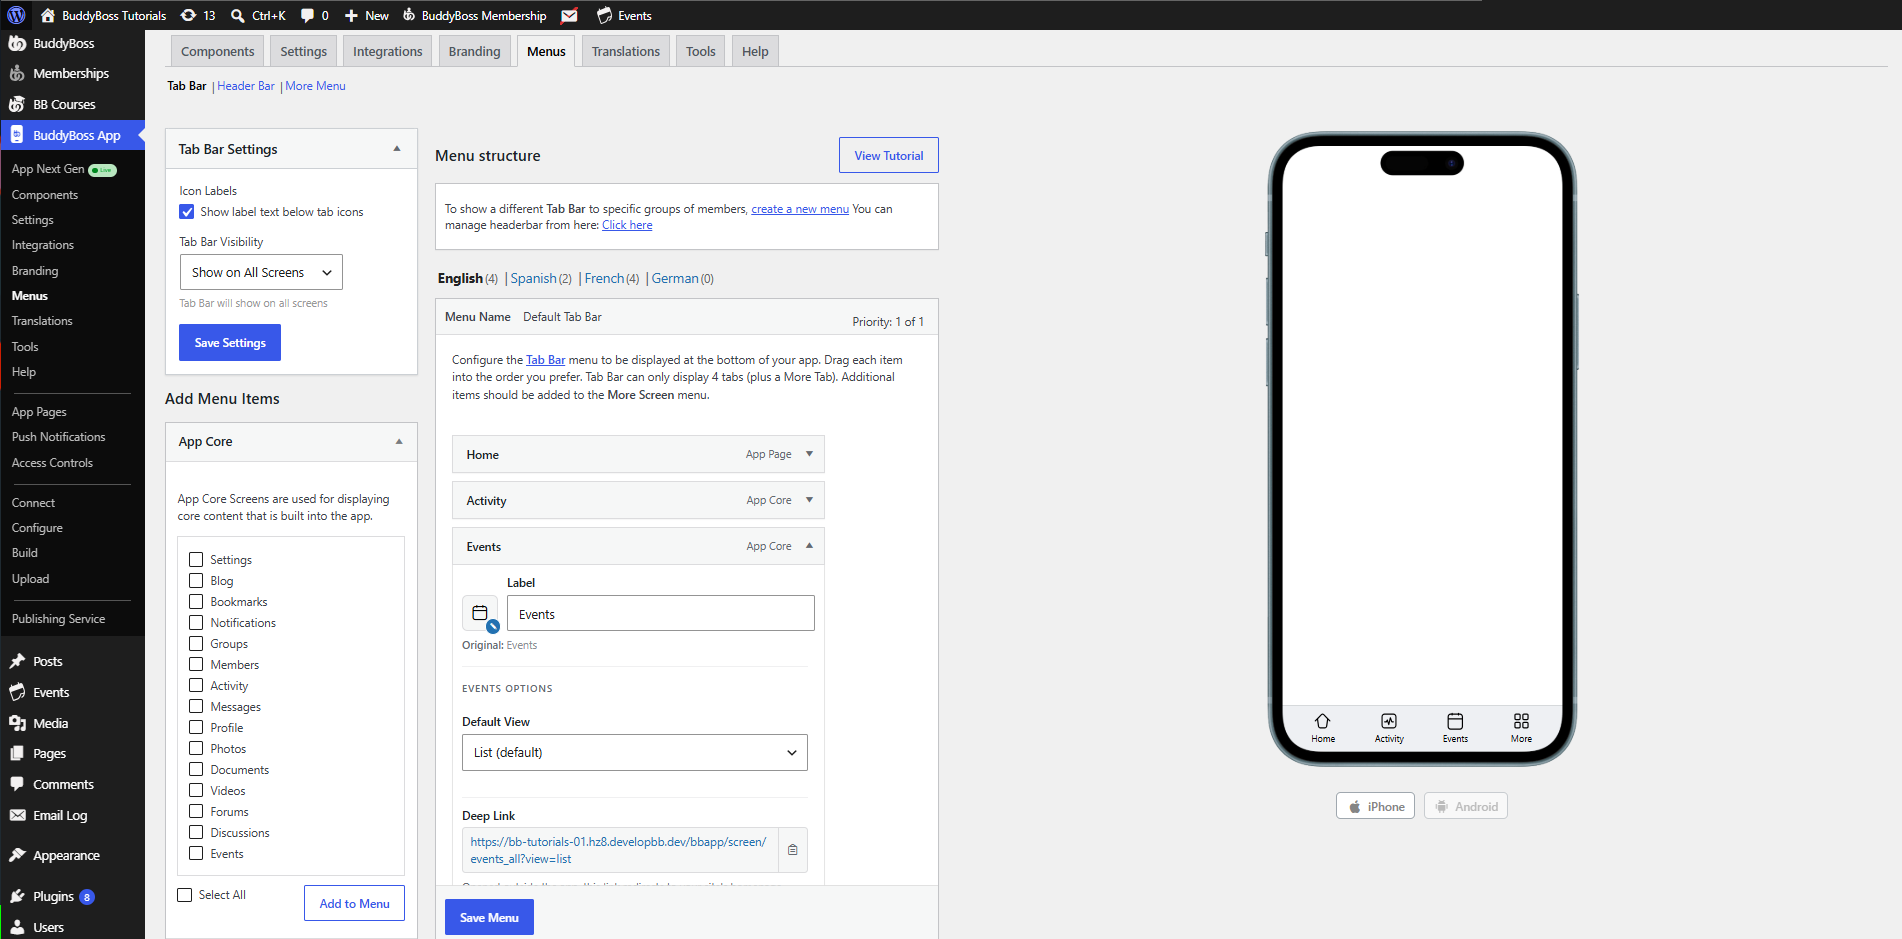
- Go to WordPress Dashboard > BuddyBoss App > Menus.
- Open the menu where you want to display Events.
- Under App Core, locate Events.
- Select Events.
- Click Add to Menu.
- Reposition the Events menu item as needed.
- Click Save Menu.
The Events screen will now be available from your app navigation.
Add My Events to the More Menu
The My Events screen gives members quick access to events associated with their account, organized into upcoming and past events. The existing Events functionality separates these into Upcoming Events and Past Events.
To add My Events:
- Go to WordPress Dashboard > BuddyBoss App > Menus.
- Open the More Menu.
- Locate and select My Events.
- Click Add to Menu.
- Position the menu item as needed.
- Click Save Menu.
Members can now access their upcoming and past events directly from the More screen.
Add Events to an App Page
You can also feature events on an App Page, such as your app’s Home page. This allows members to discover upcoming or featured events as soon as they open the app.
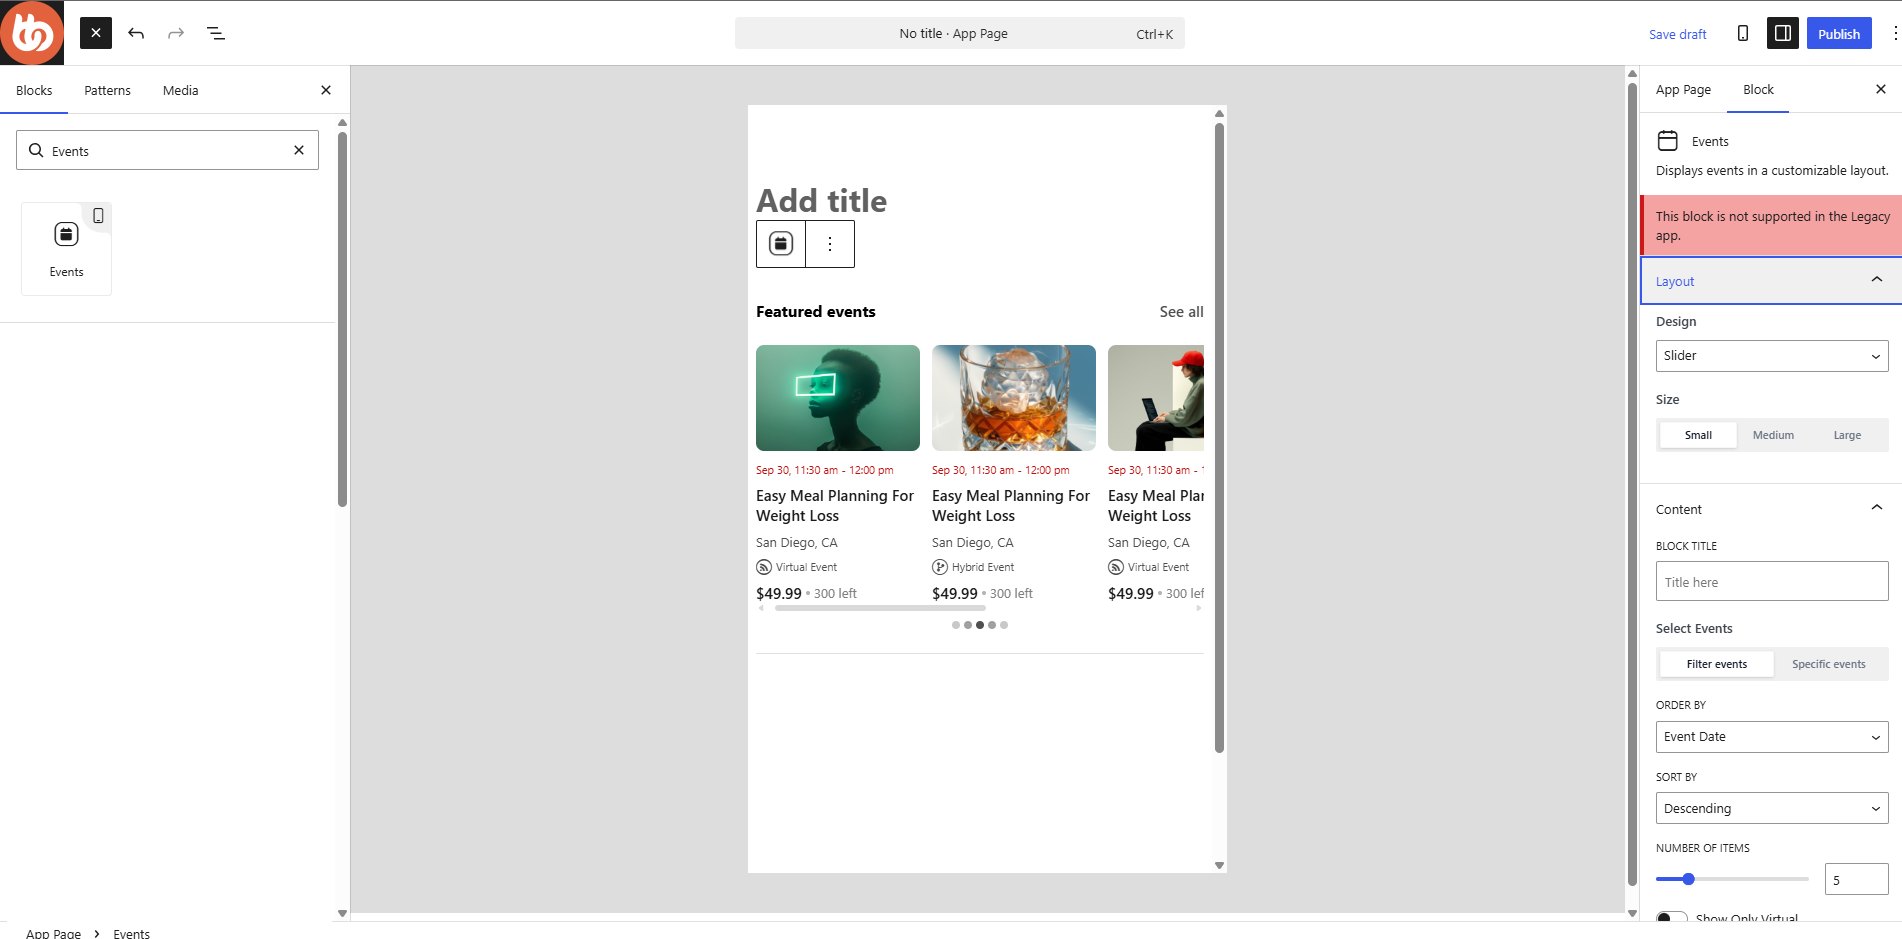
- Go to WordPress Dashboard > BuddyBoss App > App Pages.
- Locate the App Page where you want to display events.
- Click Edit.
- Click the + icon to open the available blocks.
- Scroll to the BuddyBoss App blocks.
- Add the Events block to the page.
Important: The Events block is supported in App Next Gen. If your app is still using the legacy app experience, the block settings will display a warning and the block will not appear in the app.
Configure the Events Block
Select the Events block in the App Page editor to configure its content and appearance from the settings panel.
Layout
Design – Choose how events are displayed within the block.
- Slider – Displays events in a horizontally scrollable layout.
- List – Displays events vertically in a list.
- Grid – Displays events in a grid layout.
Depending on the selected design, additional size options may become available.
Content
Use the Content settings to determine which events appear in the block.
- Block Title – Enter the heading displayed above the Events block.
- Content Selection – Choose whether the block should automatically retrieve events using filters or display specific events that you select manually.
- Order By – Choose the event property used to determine the display order.
- Sort Direction – Choose whether events are displayed in ascending or descending order.
- Number of Events – Set the maximum number of events displayed in the block.
- Virtual Events Only – Enable this option to display only virtual events.
- Hybrid Events Only – Enable this option to display only hybrid events.
Customize the Events Block Colors
Use the Color settings to customize the appearance of the Events block.
- Light/Dark Mode – Choose which color configuration you want to customize.
- Heading Color – Controls the color of headings displayed within the block.
- Body Color – Controls the color of supporting event information.
- Background Color – Controls the background color of the Events block.
Configure the Light and Dark Mode colors as needed so the block matches the rest of your app branding.
Configure Event Card Settings
The Settings section lets you control which information appears on individual event cards.
Use the available toggles to show or hide event information according to the experience you want to provide. This allows you to create a simplified event card containing only essential information or provide members with more event details, such as the event cover image and remaining ticket availability.
Once you have finished configuring the block, click Save to apply your changes.
Browse and Explore Events
View Events
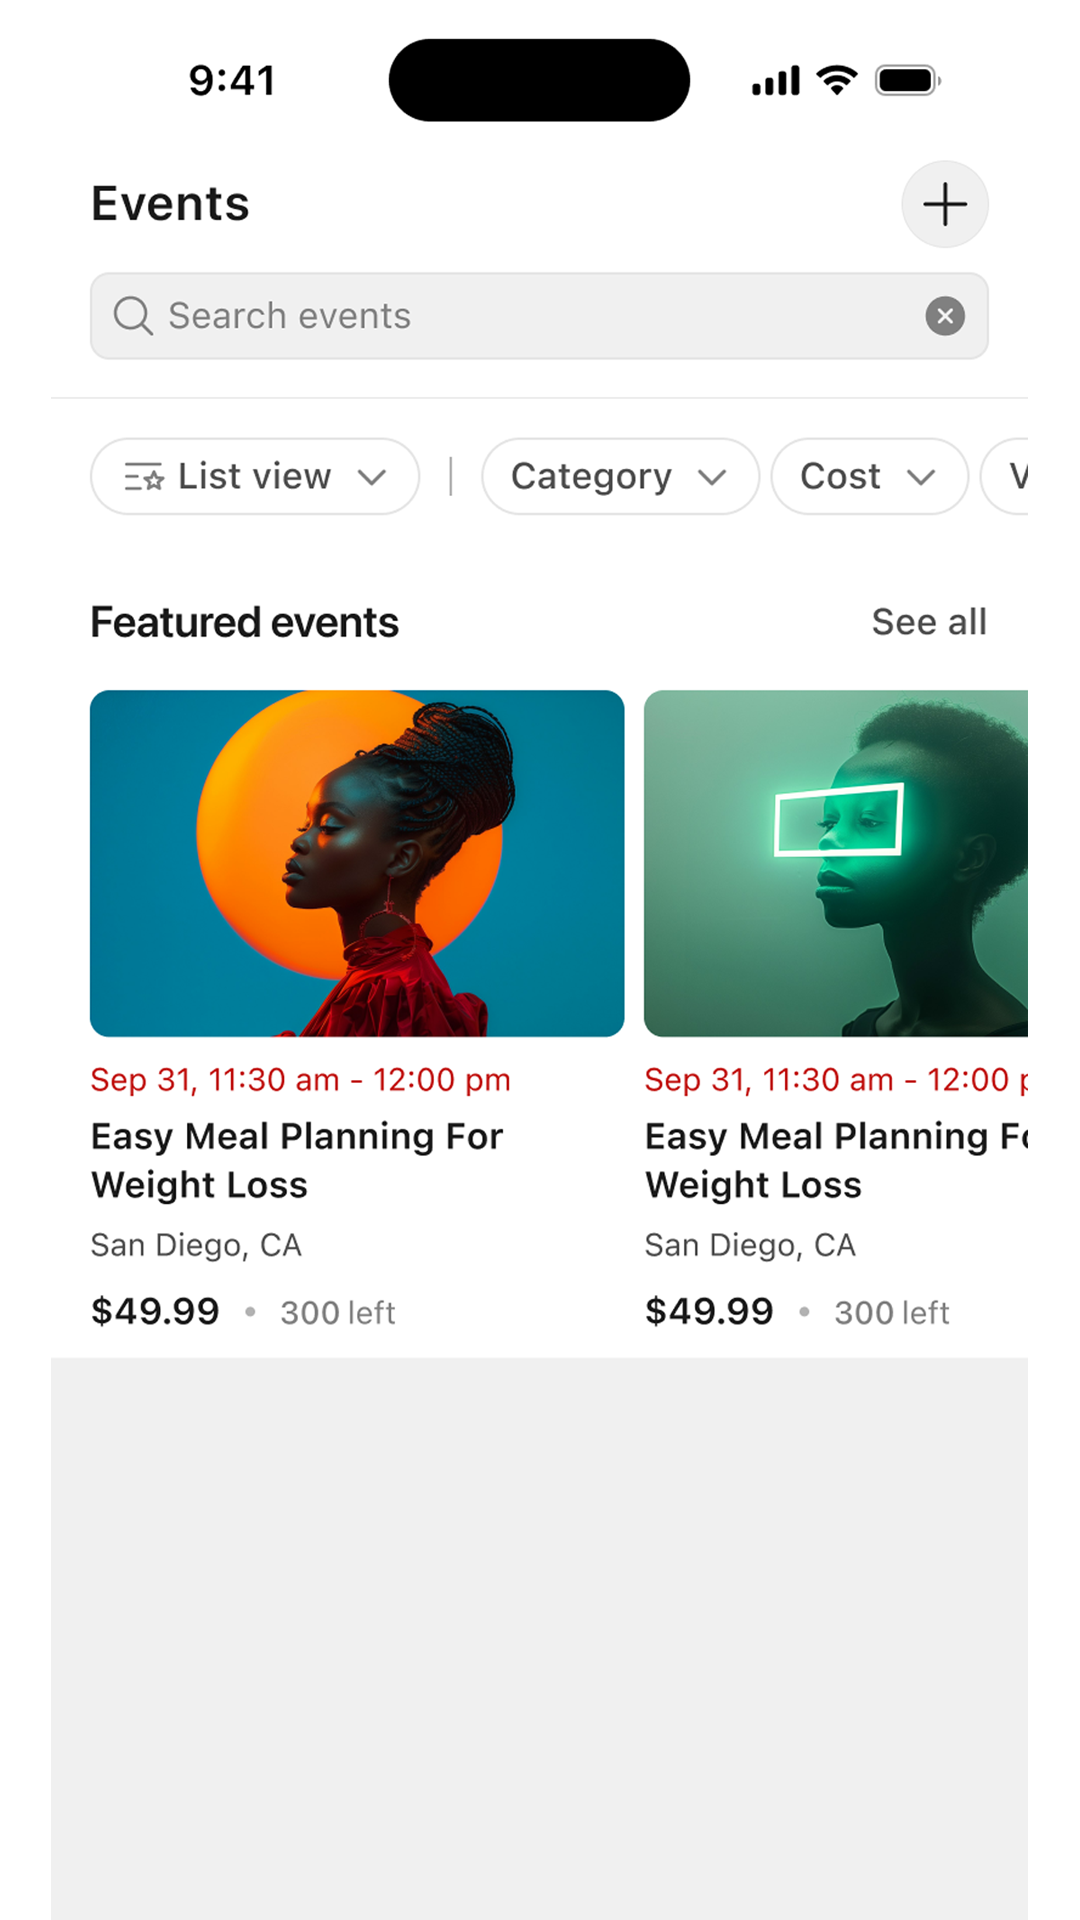
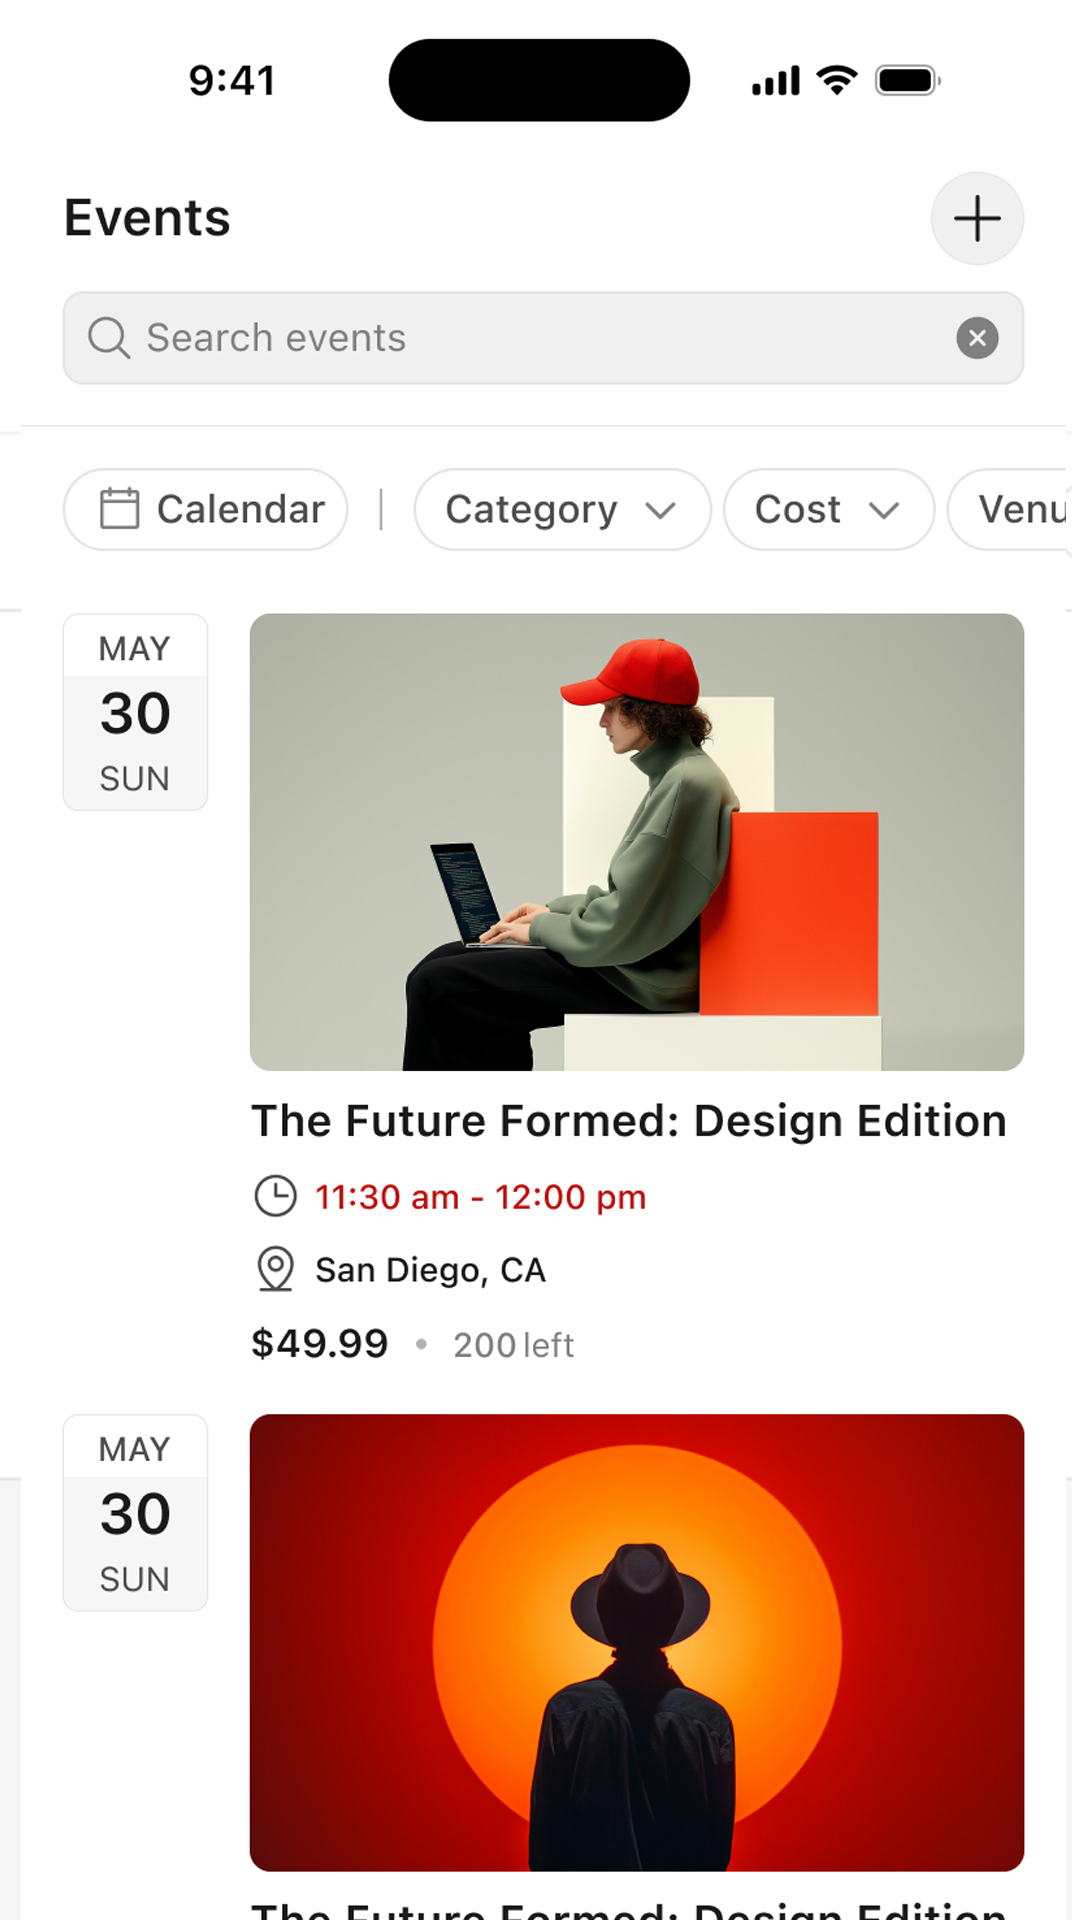
The Events screen displays the events available to the member.
Members can:
- Search for events by name.
- View featured events.
- Browse events in a list, calendar, or map view.
- Filter events by category, cost, venue, or day.
- Review the event date, time, location, price, and remaining ticket availability.
- Open an event to view its complete details.
Change the Event View
Members can choose how events are displayed.
List View – The List view displays events in chronological order. Each event card may include:
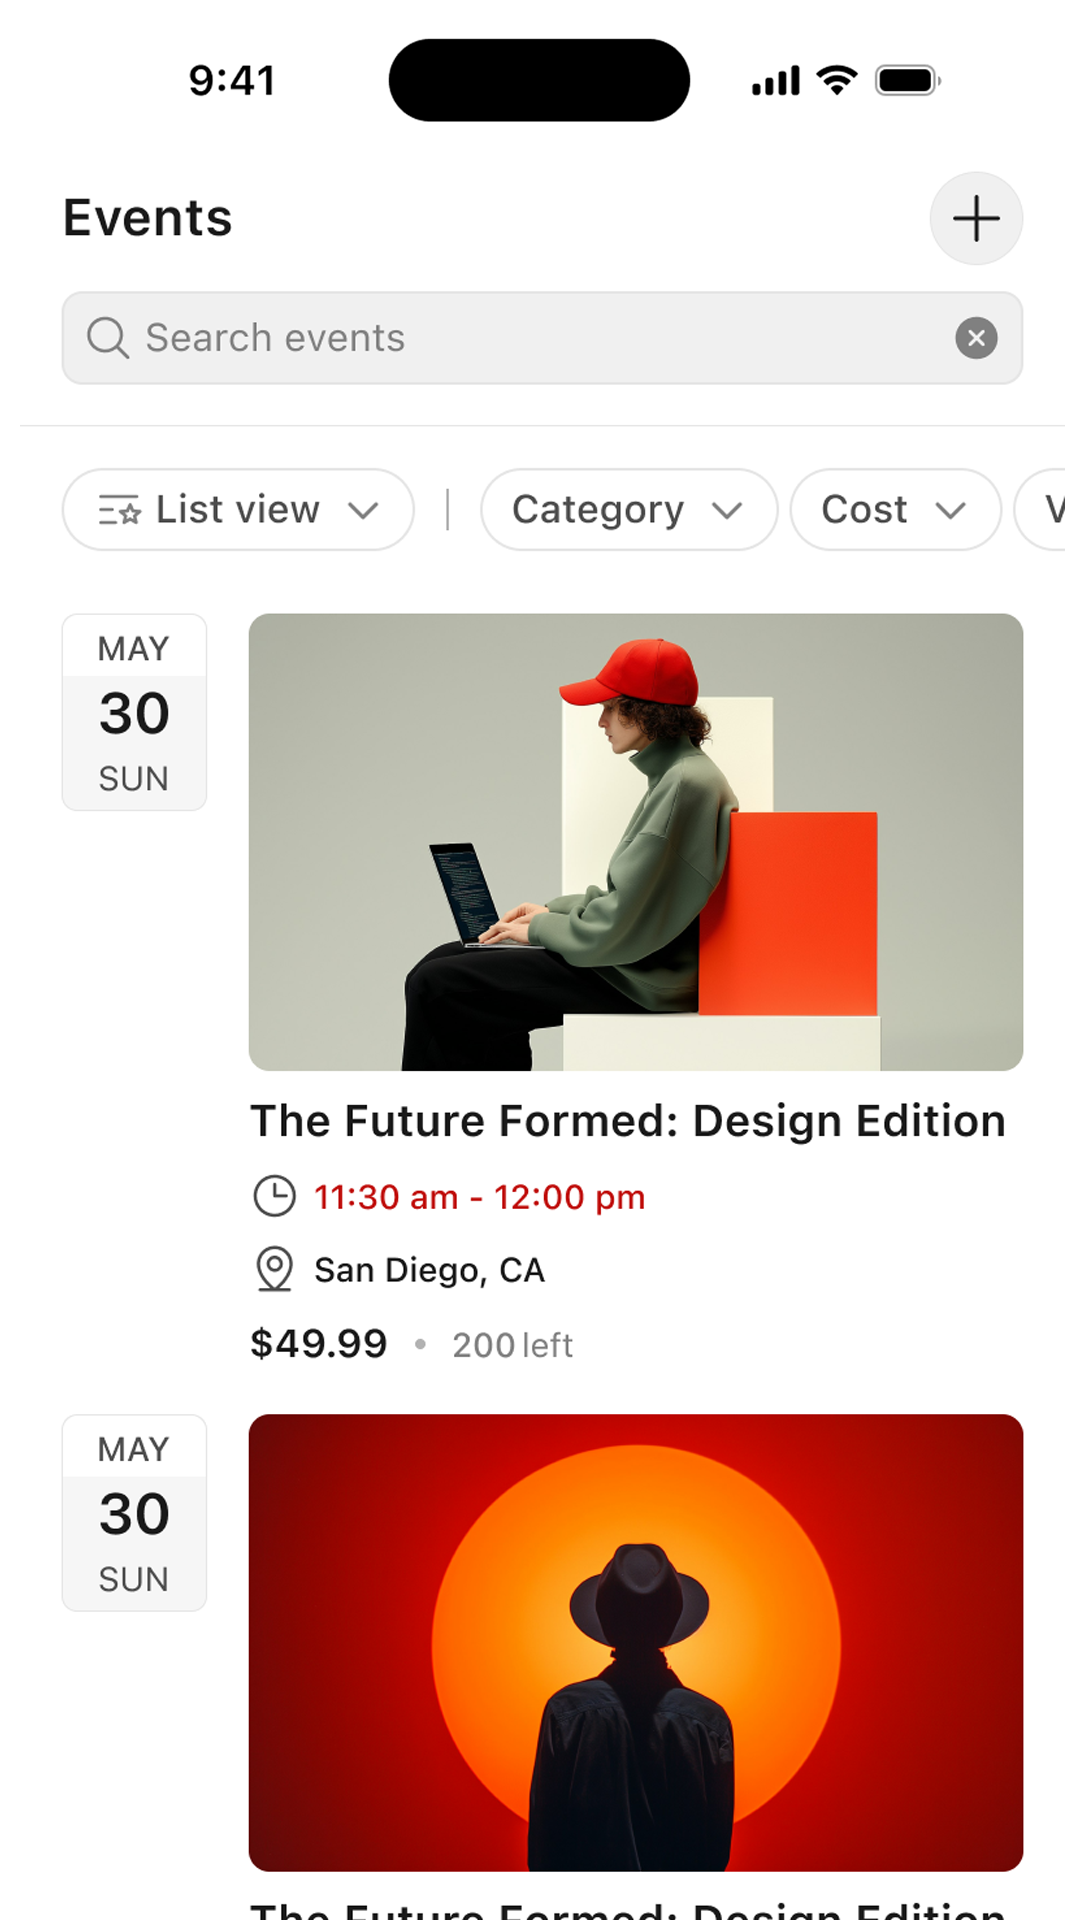
- Event image
- Event title
- Date and time
- Event type
- Location
- Price
- Remaining ticket availability
Calendar View – The Calendar view organizes events by date.
Members can:
- Select a date from the calendar.
- Review events scheduled for that date.
- Switch between different calendar date ranges when available.
- Open an event to view its details.
Dates without scheduled events display an empty-state message.
Map View – The Map view displays event locations as markers.
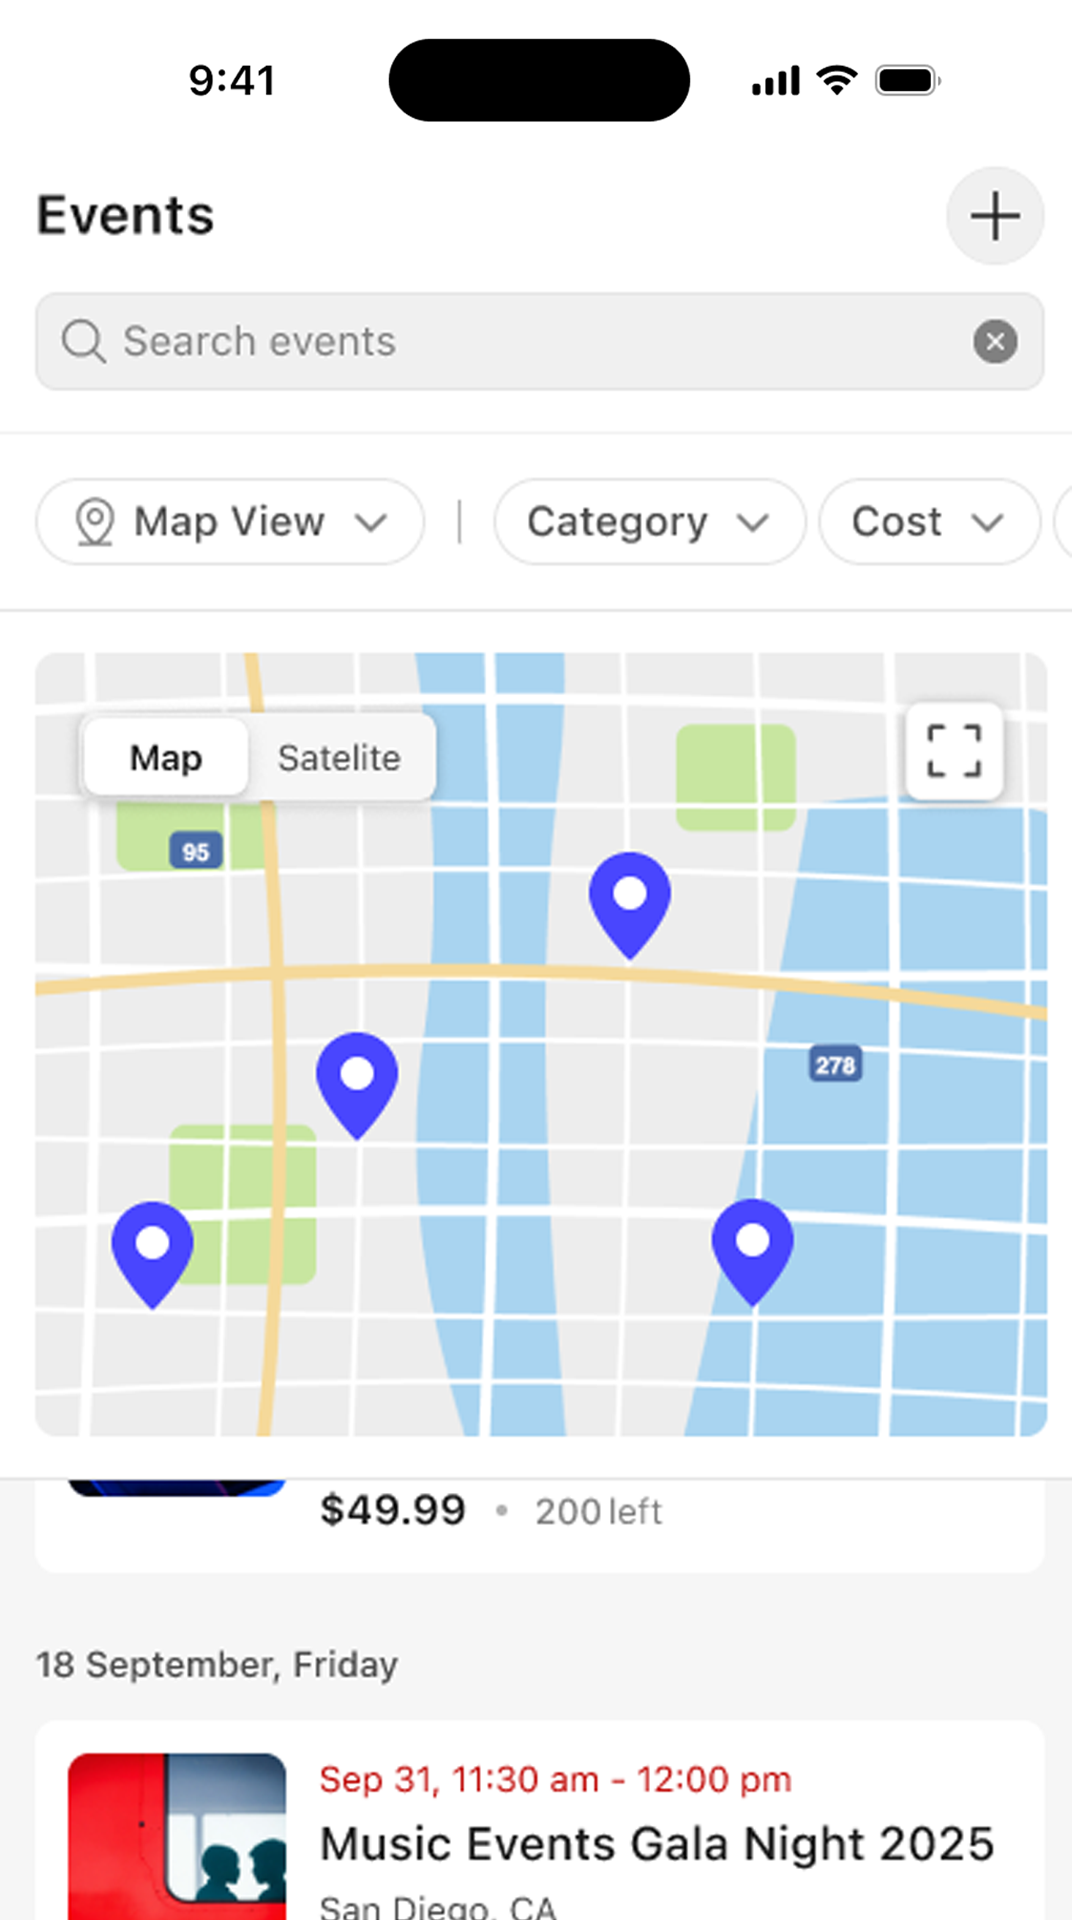
Members can:
- Select a marker to view the corresponding event.
- Browse event cards displayed below the map.
- Open an event from its card to view more information.
Filter Events
The available filters help members narrow the event list.
Depending on the event configuration, filters may include:
- Category – Display events from a selected category.
- Tags – Display events associated with one or more selected tags.
- Cost – Filter events by free or paid availability.
- Venue – Display events held at a selected venue.
- Organizers – Display events hosted by one or more selected organizers.
- Featured – Display only events that have been marked as featured.
- Countries – Display events taking place in a selected country.
- State – Display events taking place in a selected state or province.
- Days – Select one or more days of the week.
- Time – Display events occurring during a selected time or time range.
View Upcoming and Past Events
The My Events screen separates a member’s events into:
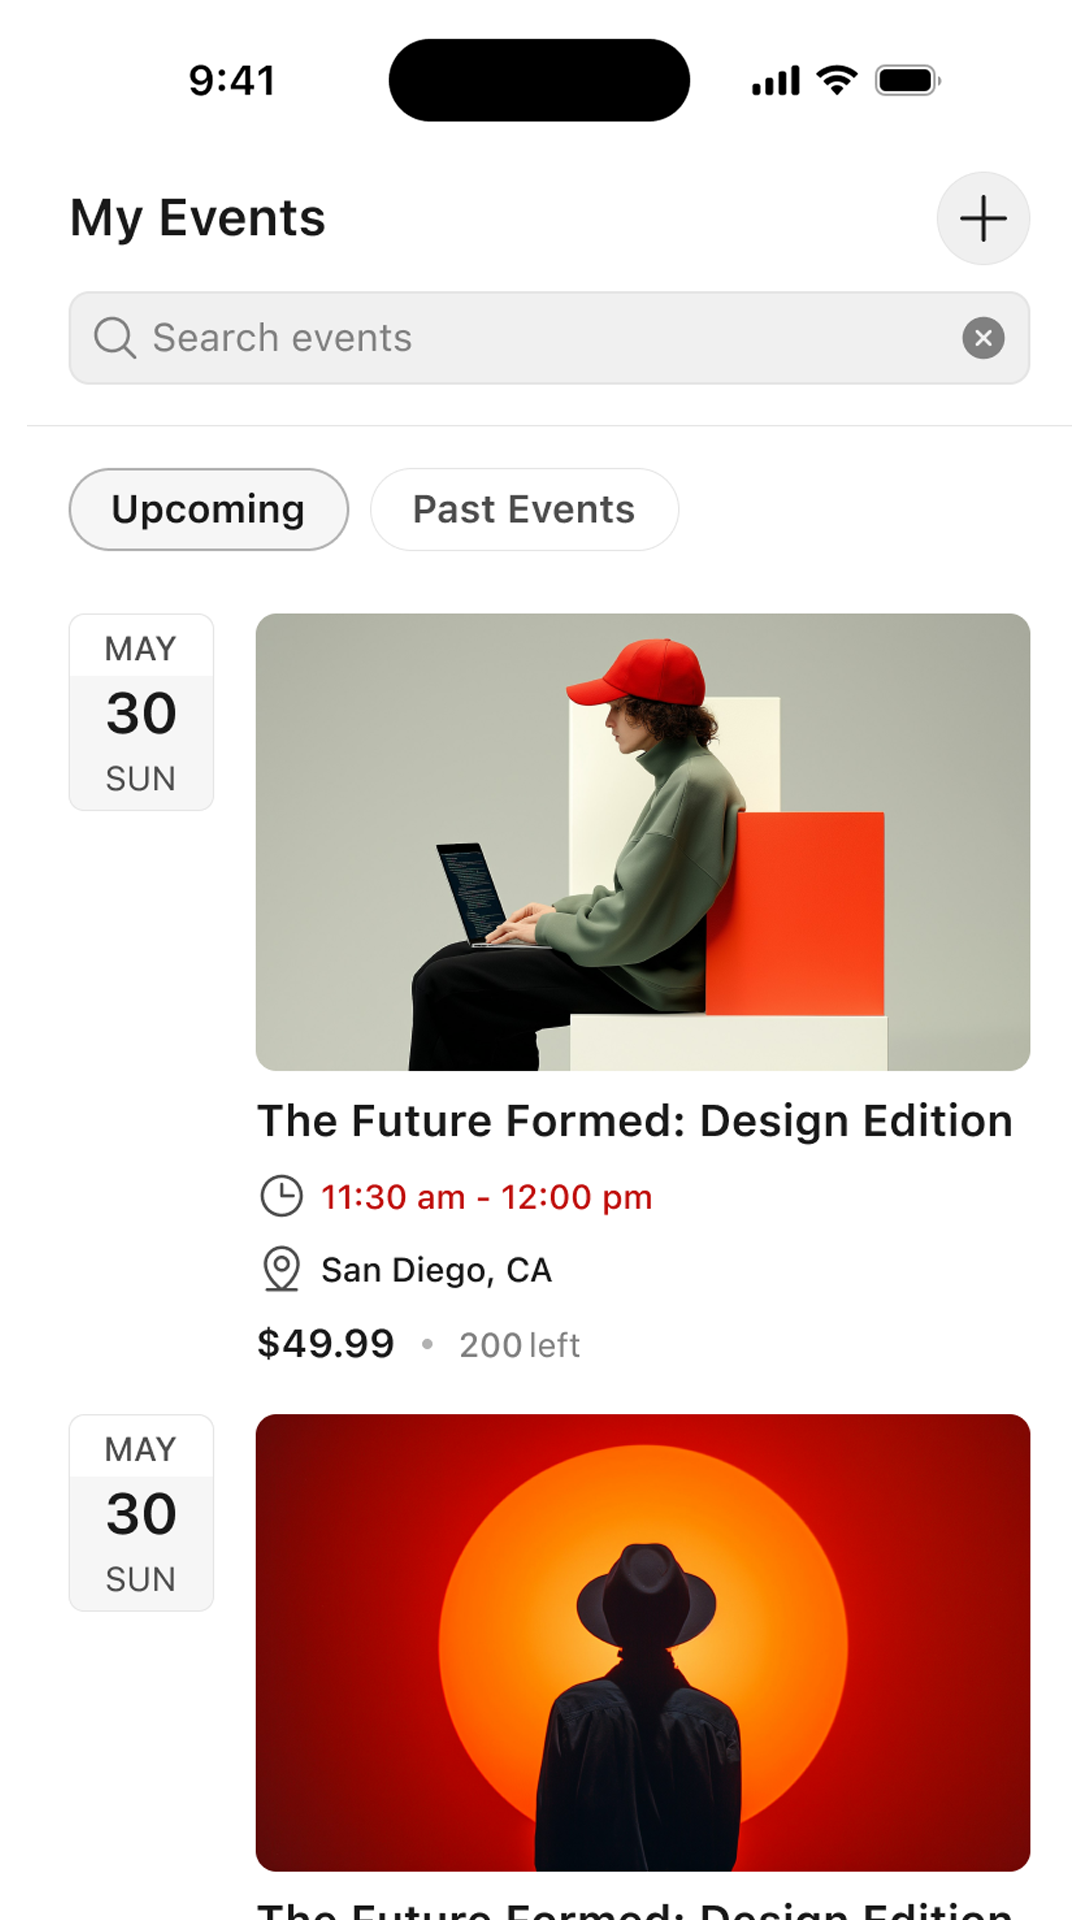
- Upcoming Events – Events that have not yet taken place.
- Past Events – Events that have already ended.
Each event card provides quick access to its date, time, location, price, and ticket details.
Create a New Event
When members have permission to create events, a + button appears at the top right of the Events screen.
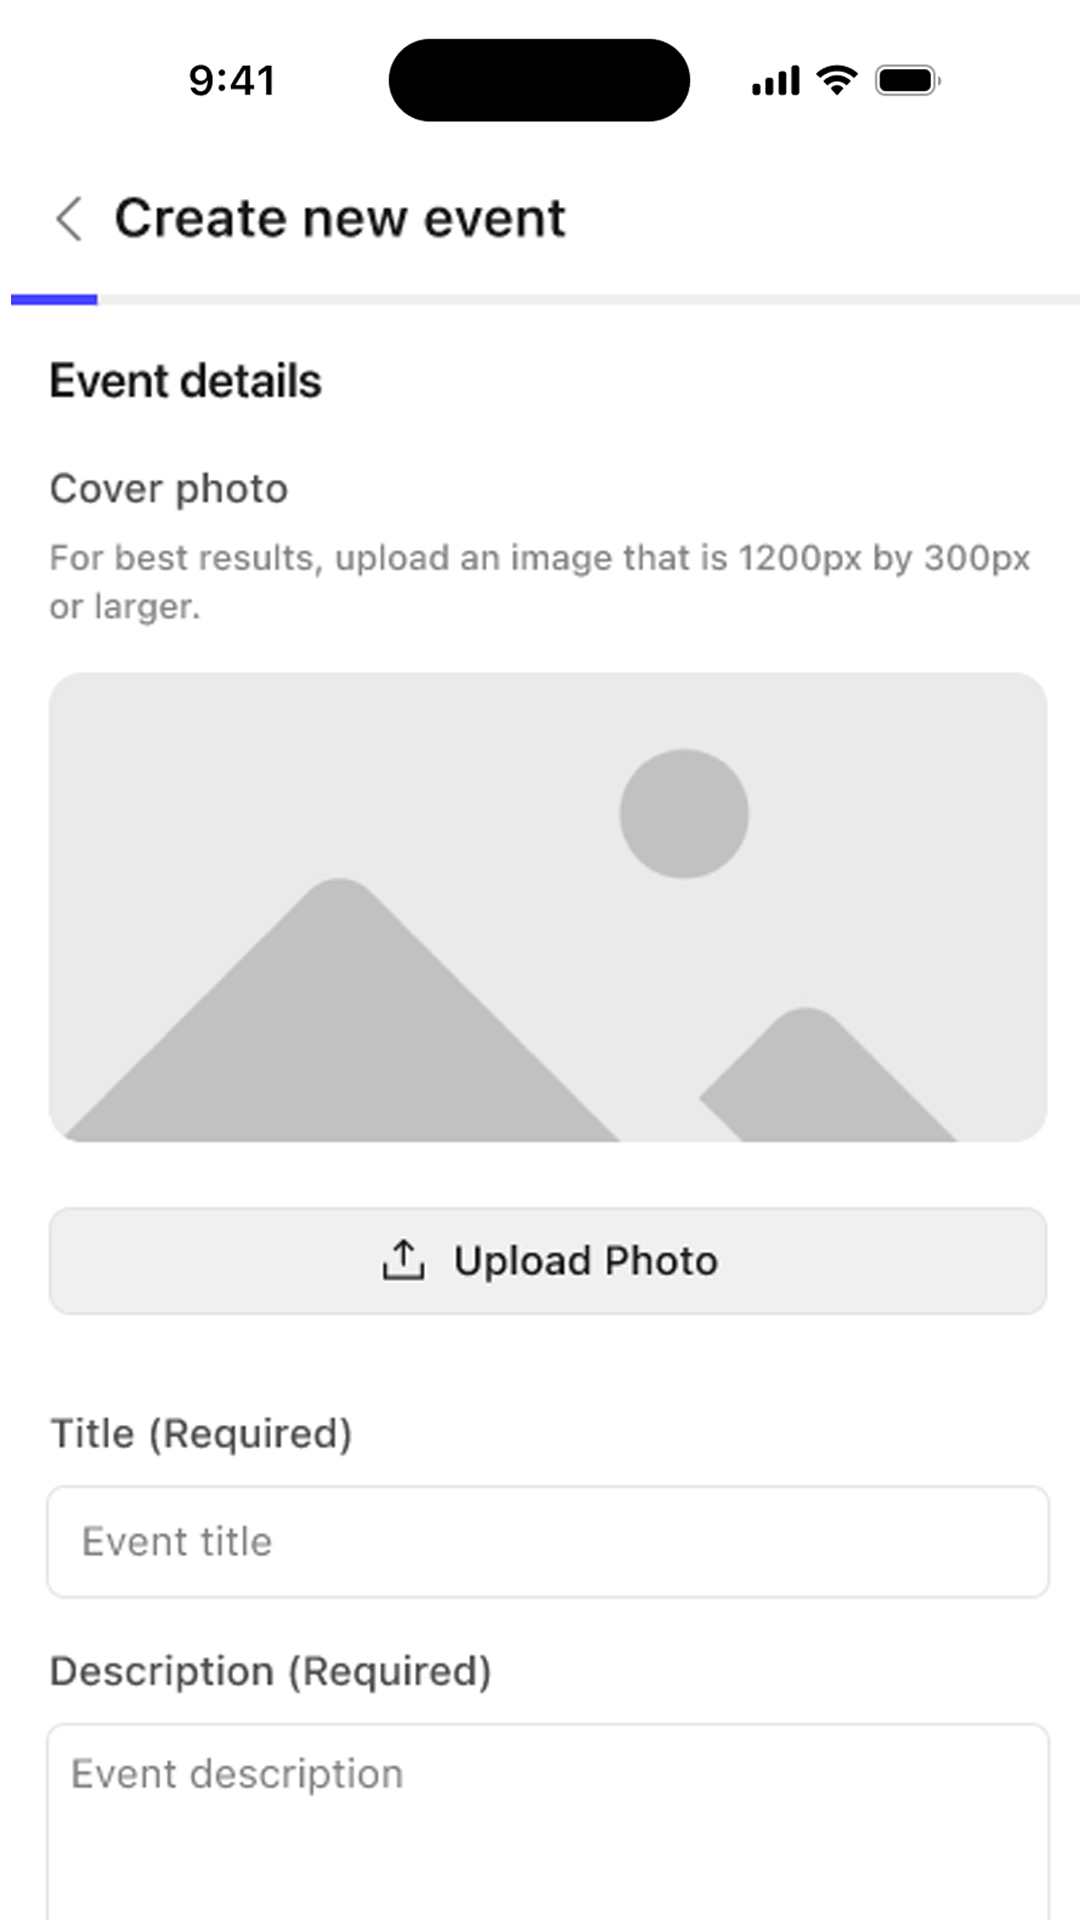
To begin creating an event:
- Open Events.
- Select the + button.
- Upload a cover image.
- Enter the event title.
- Add the event description.
- Enter any applicable tags.
- Choose the initial event status.
- Select Next Step.
Available statuses may include:
- Scheduled
- Draft
- Pending
Configure the Event Date and Time
During event creation, configure when the event takes place.
- Enter the event start date and time.
- Enter the event end date and time.
- Select the correct timezone.
- Enable All day when the event does not use specific start and end times.
- Select Next Step.
Configure a Recurring Event
Enable Repeat this event to create an event that occurs more than once.
Available recurrence options may include:
- Daily
- Weekly
- Monthly
- Yearly
You can also configure:
- How often the event repeats
- Whether the recurrence ends on a date, after a set number of occurrences, or never
- Dates that should be skipped as exceptions
To add an exception:
- Select Add Date.
- Choose the date that should be skipped.
- Repeat the process for any additional exceptions.
Choose the Event Type
The app supports different event formats.
In-Person Event
Select In person for an event held at a physical location.
Enter the available venue information, such as:
- Venue name
- Address
- City
- State or province
- Phone number
- Website
Select Add New Venue to add another venue when needed.
Virtual Event
Select Virtual event for an online event.
Configure a Virtual Event
Virtual and hybrid events can include a video or meeting experience.
Depending on the selected source, you can:
- Search for a video or meeting link.
- Enter a video or meeting URL.
- Use a supported video platform.
- Enter a YouTube channel ID.
- Enable autoplay.
- Include live chat.
- Mute the video.
- Use modest branding.
- Restrict related videos.
- Hide video controls.
A preview may appear after a valid video link is added.
Configure the Virtual Event Display – Choose how members access the virtual event.
Available display options may include:
- Embed video – Displays the video directly on the event page.
- Link button – Displays a button that opens the virtual event.
You can also customize the button label, such as Join Event.
Control When the Virtual Event Appears – Choose when the virtual content becomes available.
Available options may include:
- When the event is published
- When the event starts
This helps prevent members from accessing the virtual-event link earlier than intended.
Control Who Can View the Virtual Event – Choose which members can access the virtual content.
Available options may include:
- Everyone
- Logged-in users
- RSVP attendees only
- Ticket attendees only
Use this setting to match access with the event’s registration or ticket requirements.
Share the Virtual Event Link – Virtual-event links may be included in:
- RSVP confirmation emails
- Ticket confirmation emails
Enable the appropriate options based on how members register for the event.
You can also choose whether the virtual-event label appears:
- On the event page
- On calendar views
Note: Public virtual events may be indexed by search engines as online events.
Hybrid Event
Select Hybrid event when the event includes both an in-person venue and an online experience.
For hybrid events, configure both the venue details and the virtual-event settings.
Add Event Organizers
Organizers can be added manually or selected from existing community members.
Add an Organizer Manually
- Enter the organizer’s name.
- Add their phone number.
- Enter their website.
- Add their email address.
- Select Add New Organizer to add another organizer.
Select an Existing Member
- Open the organizer selector.
- Search for a community member.
- Select the required organizer.
- Repeat the process to assign additional organizers.
- Select Next.
Publish or Submit the Event
After completing the event setup:
- Review the event details.
- Confirm the date, type, venue, virtual settings, and organizers.
- Continue through the remaining event-creation steps.
- Submit or publish the event according to the permissions available to your account.
Events submitted with a Pending status may require administrator approval before they appear in the app.
View Event Details
The Event Details screen provides the complete information available for an event.
Depending on the event configuration, the page may display:
- Cover image
- Event title
- Date and time
- Venue or virtual-event label
- Price
- Remaining ticket availability
- Event summary
- Organizers
- Contact details
- Website
- Categories and tags
- Venue map
- Event schedule
- Ticket, RSVP, or calendar actions
Members can expand the summary to read the complete event description.
View Organizers
The Organizers section displays the people or organizations responsible for the event.
Organizer information may include:
- Name
- Profile image
- Phone number
- Email address
- Website
- Number of hosted events
Members can select Details to view more information about an organizer.
View the Event Schedule
When event scheduling is available, the Event Details page includes a Schedule section.
The schedule can display:
- Session time
- Track
- Session title
- Speaker or presenter
- Session description
- Sponsoring or presenting organization
To review a session:
- Open the event.
- Scroll to the Schedule section.
- Select a session.
- Review the session details, speaker, time, and presenter information.
Note: Event schedules may require the corresponding scheduling add-on to be installed and configured.
Event Tickets
Get an Event Ticket
Events that require tickets display a Get Ticket button.
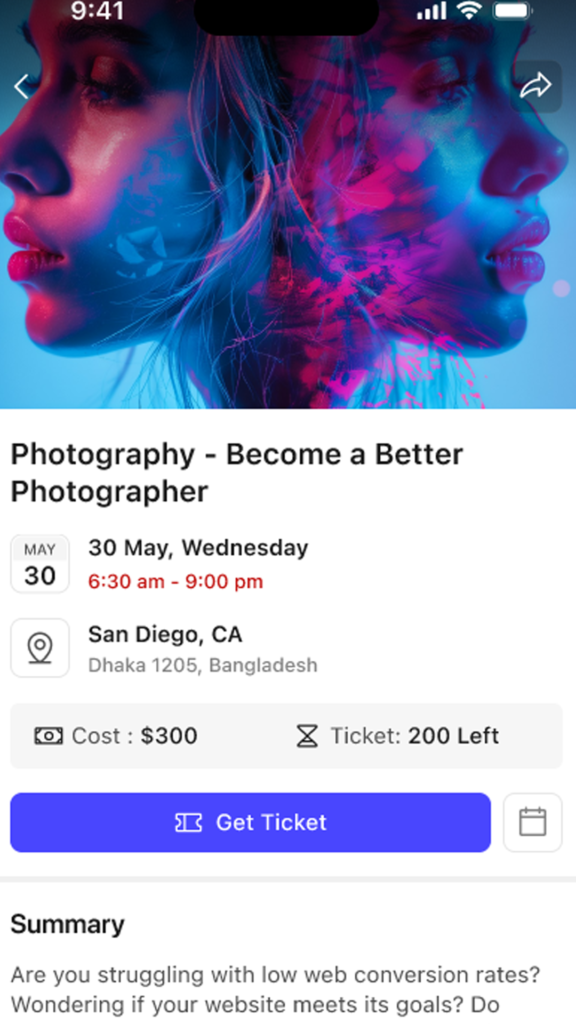
To get a ticket:
- Open the event.
- Select Get Ticket.
- Review the ticket name, description, price, and remaining availability.
- Use the quantity controls to select the number of tickets.
- Review the quantity and total price.
- Select Get Tickets to continue.
The exact checkout process depends on the ticket and payment configuration of the website.
Access Event Tickets
When a member has tickets for an event, the Event Details page may display a View Tickets option.
The ticket screen can include:
- Event details
- Order number
- Ticket type
- Purchaser information
- Attendee information
- PDF ticket option
- Add to Apple Wallet option
Members can expand or hide attendee details when supported.
Add a Ticket to Apple Wallet
When the Wallet Plus add-on is available, eligible event tickets can be added to Apple Wallet.
To add a ticket:
- Open the event.
- Select View Tickets.
- Locate the required ticket.
- Select Add to Apple Wallet.
- Follow the device prompts to save the pass.
Members may also be able to download a PDF version of the ticket.
Note: Wallet functionality requires the applicable Wallet Plus add-on and a supported device.
RSVP to an Event
Events that use attendance responses display an RSVP button.
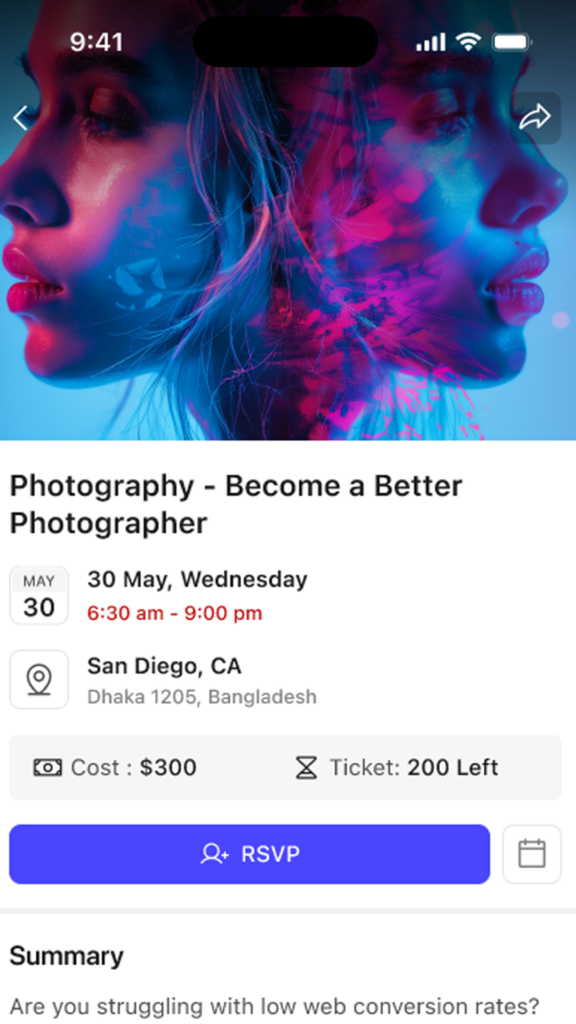
To submit an RSVP:
- Open the event.
- Select RSVP.
- Choose Going or Can’t go.
- If attending, enter the required attendee information.
- Select the number of guests, when permitted.
- Select Finish to submit the response.
The RSVP window may display the remaining attendance capacity.
Add an Event to a Calendar
Members can add an event to a supported calendar application from the Event Details page.
Available options may include:
- Google Calendar
- iCalendar
- Outlook 365
- Outlook Live
To add an event:
- Open the event.
- Select Add to calendar.
- Choose the preferred calendar service.
- Follow the prompts provided by the selected calendar application.